Wednesday, January 26, 2011

Another take on a rocking chair

Now I had 3 of the rocking chairs like the one I posted about yesterday. One for each of my children. They have obviously all outgrown them, being 8, 7 and almost 4. They were all fairly similar, but a little different too. I posted all 3 of them on our local online classified and allowed customers to order them any color and style they wanted and with any personalization. They went in about 5 minutes for way more than I could have sold them for if I had tried to sell them as they were. So today, may seem a little redundant from yesterday, but since these are 3 of the projects I did last week I am going to show you another rocking chair transformation.

The second chair was ordered by a woman that asked me if I could paint it bright red and distress it, she did not want any personalization. Distressing is actually fairly simple, but there are a few ways to do it. I hope that over the course of this blog I will cover them all. For this chair, however, I did a multi-layer paint treatment with two contrasting paint colors.

Here was the before picture:
Now it was already a pretty bright red, and quite distressed, but unfortunately there was no way to remove Gavin's name which she did not want without ruining the existing paint...plus it deserved to have some new life anyway.

1) Step one was to paint the entire chair black...black is a great contrasting color to red and will later have amazing results when distressing.
It only takes one coat and it does not have to be a good coat...sloppy paint jobs have the best distressing effects!
2) Paint the new red over top unevenly, heavier in some spots than others.
3) At least 2 coats will probably be necessary, but make sure they are light coats so that the contrasting color will still seep through....again some places it will be heavier than others...

4) Sand down areas that would wear with age...the seat, the arms, the rockers, etc.
This is the first time I have attempted this technique with red...I usually use white as the top coat, which comes out AMAZING against the contrasting black.

Lets review our expenses on this project:

Black paint - already purchased
Red paint - $5.00 for 1/2 gallon (plenty left over for future projects)
Sand Paper - $2.14 (only used 1 sheet)

So for about $3.00 we transformed this old child's rocking chair into a decorative piece for her Americana home.

Chairs like this would retail for $60+. This one retails at the rockingchaircompany.com for $99.99.


Tuesday, January 25, 2011

Rocking Chair Transformation

You saw the before and afters, but now I wanted to walk you through with a step-by-step of how we got from A to B.

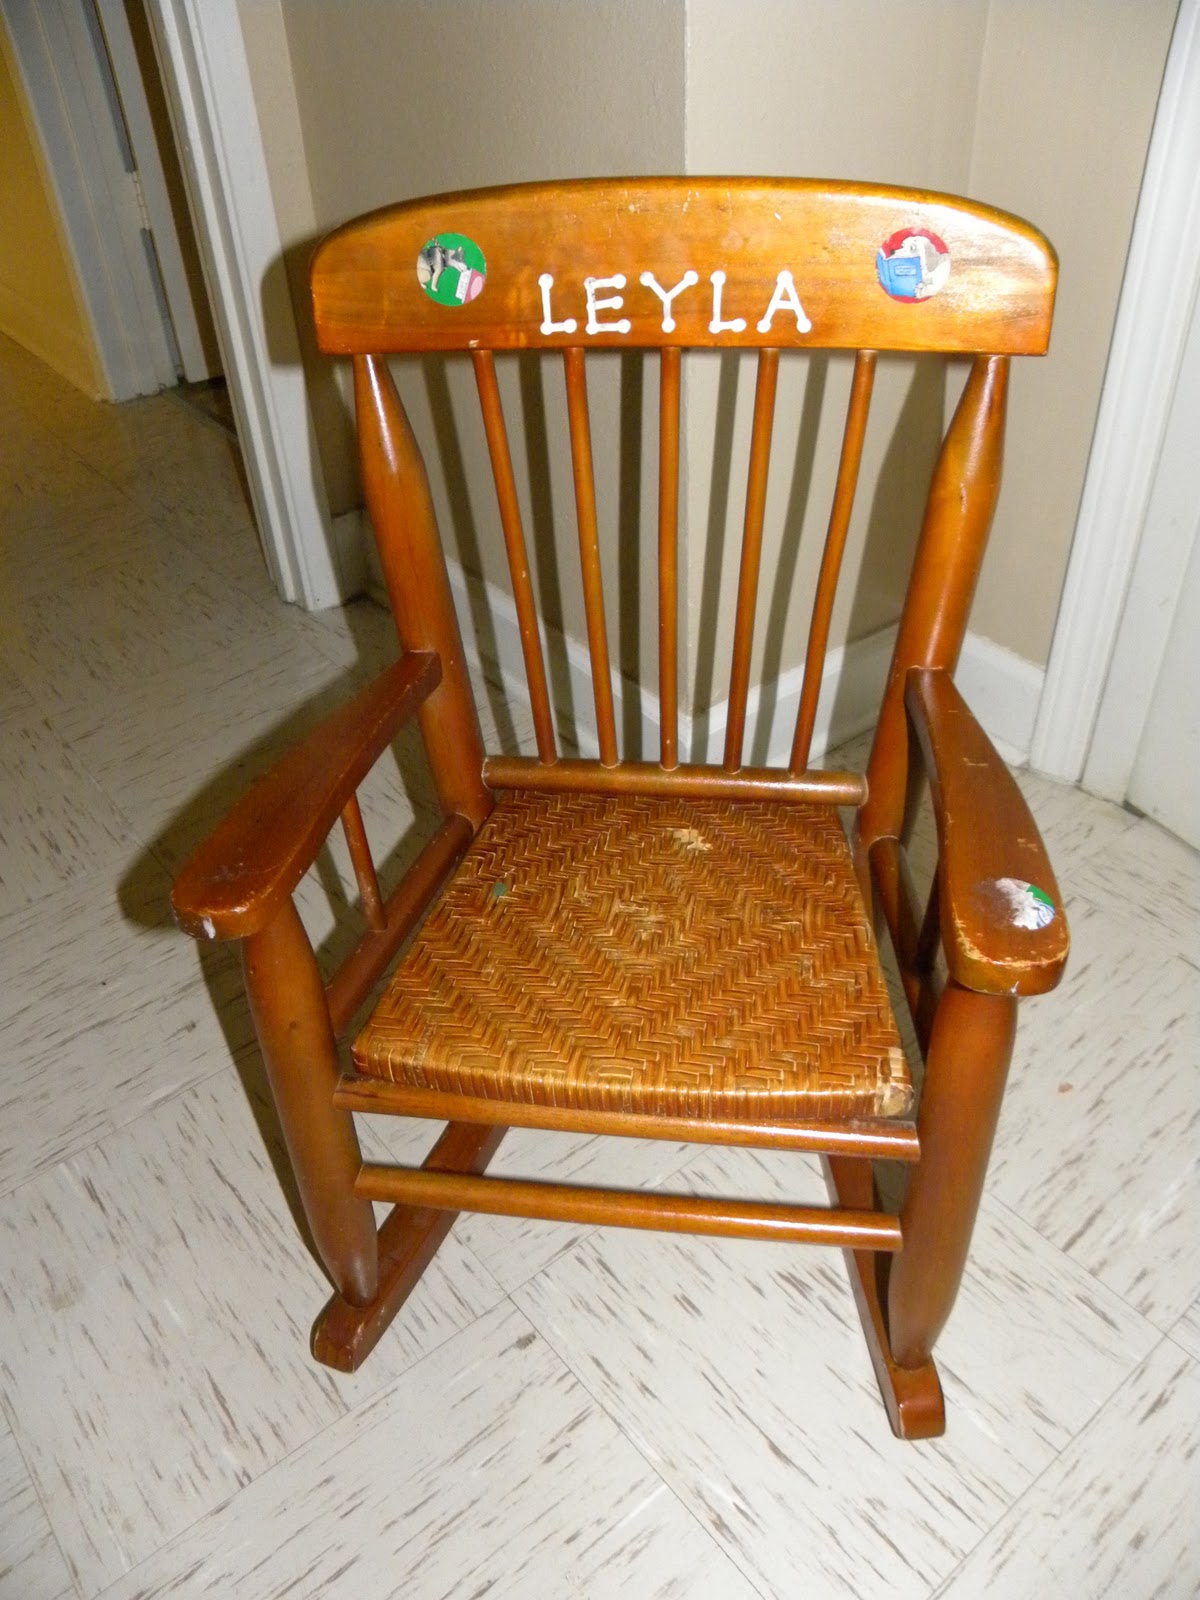
The chair at first was old...my daughter received it when she was just a baby and it saw years of destruction from all 3 of my children...now that the girls are interested in having some more grown up pieces in their room like a vanity and a desk, these little chairs no longer have a place. So I decided to refinish them and make them new for another little girl to enjoy.
Supplies Purchased:
$5.00 1/2 Gallon of Black Paint (Didn't even put a dent in it, plenty more for lots of other projects)
$4.00 Mini Cursive Letters Box (Still have enough to do other names)
$2.99 1 yard of Fabric (Was a remnant from a vanity project I did for my daughter's room)
$3.49 Krylon Spray Primer (leftover from another project)
$5.00 2 pack of chair sized foam pieces (used 1/2 of 1)

Overall used about $5.00 worth of supplies


Steps:
1) Wash the piece and strip those stickers off. Also a good time to remove the seat if it is able to be removed.


2) Sand it all over evenly to loosen up any existing finish and also to help remove any remnants of the stickers and old name.

3) Prime the chair - I use a spray primer by Krylon
4) First coat of paint color. For this project I chose black because it went so elegantly with the fabric the client chose for her seat.


Since the rocking chair was such a drastic color difference from the original color and is very lightweight to pick up. I recommend painting underneath too. Overall the entire painting process will require about 2 full coats and one brush up coat.

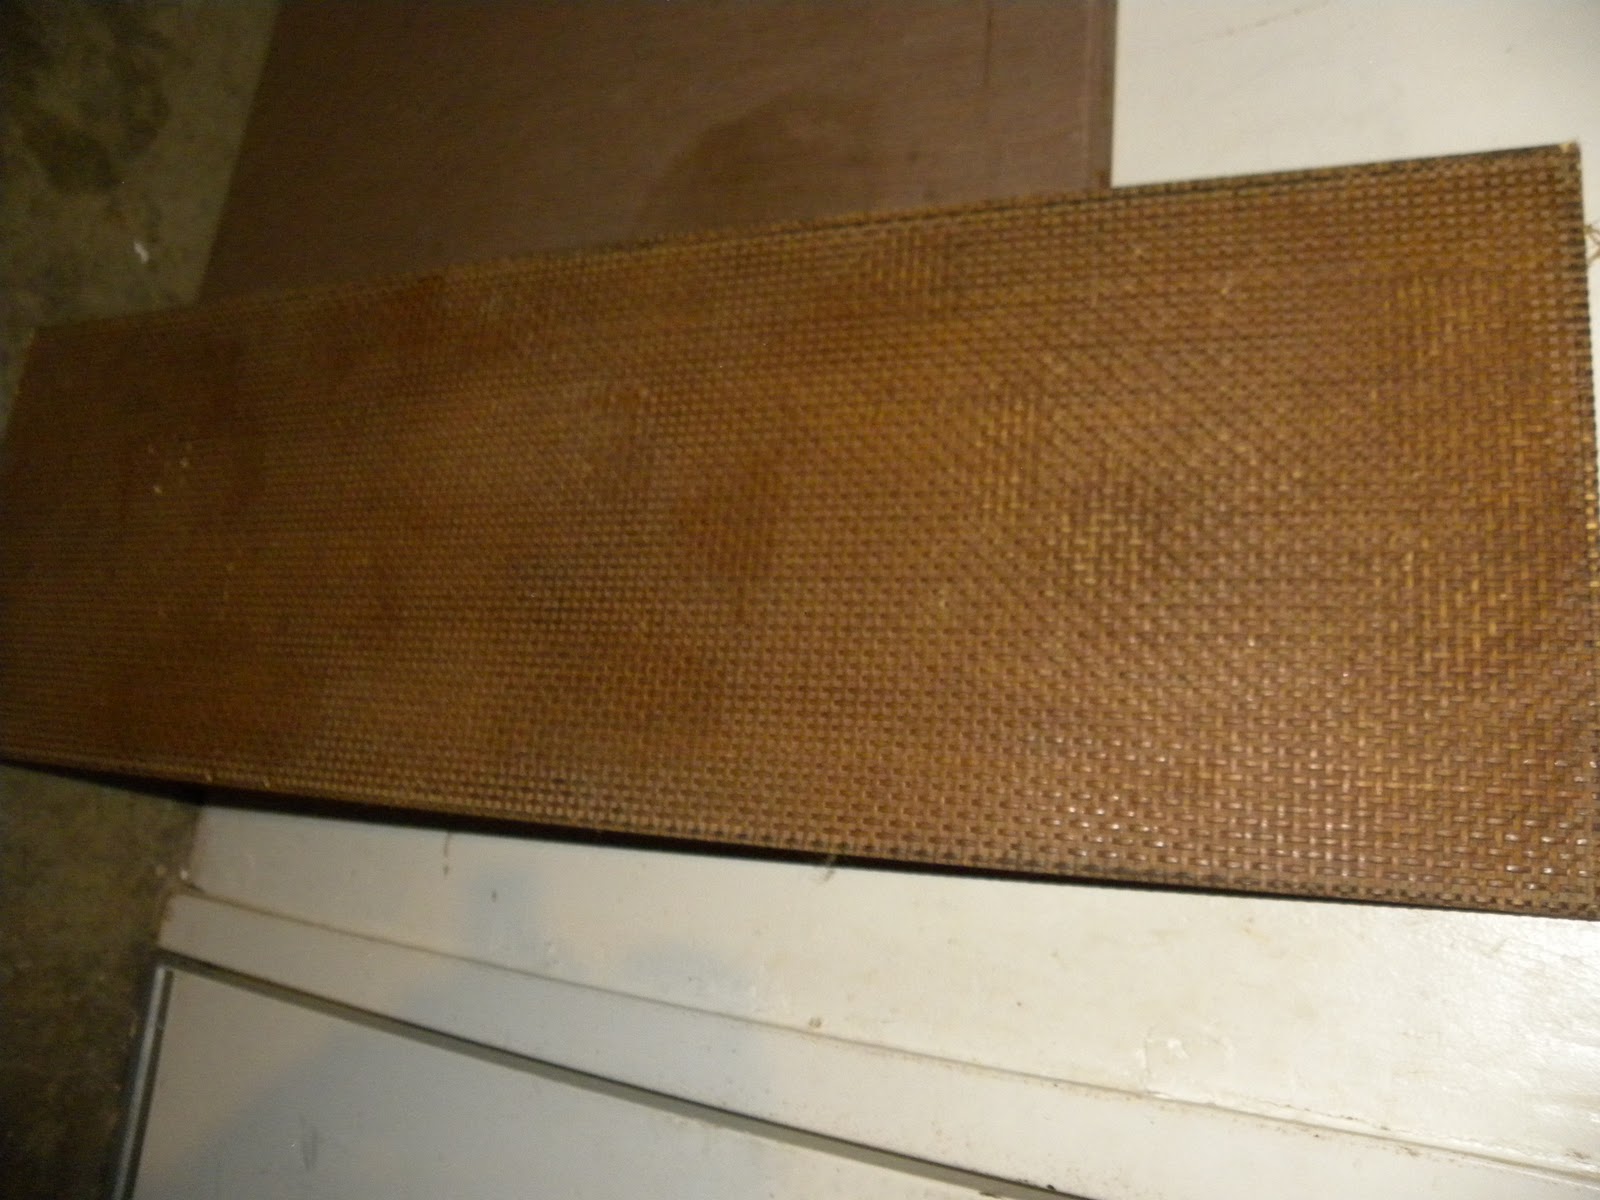
5) The client did not care for the wicker look to the seat, plus the wicker was damaged and last I heard that is not easy to reweave and repair. So instead, I added a foam cushion, and some fabric left over from another project and gave her an adorable cushioned seat. The cushion was necessary not only for comfort, but also to keep the weave from being visible through the fabric.


Please excuse the blurry pictures, my daughter is 7 and I let her be my photographer she forgot to turn on the flash until the final picture. I would normally work with a little more fabric to not have it be so stretched and so close to the frame of the seat, but since this was a remnant I only had a little bit of the fabric left.

6.  Put the seat back on the base and glue the name letters on (these were painted to match the flowers in the fabric)
Great transformation for $5.00!

I found a few rocking chairs at an online retailer (www.rockingchairs.com) that were ALOT of money.
Retails for $59.99


This one has fabric elements and is black and modern like the one I made, but it retails for $119.99.

Thursday, January 20, 2011

Good news, Bad News

Well I will start with the bad news, I didn't go treasure hunting last night...and from the looks of the snowy weather rolling in I probably won't tonight either. But I have enough projects to fill a couple weeks worth of my time anyway so I suppose its ok. I will start over again on Sunday and look forward to finding more pieces as tax season really comes into swing (out with the old and in with the new time).
Now for the good news...I still have plenty of projects around the house that I can post pictures of. Remember that next week I am going to start posting my before and after pictures as well as how to photos. I will include project prices too so that you can get an idea for how much projects cost.

The first thing I want to point out is that if you have any old throw pillows around the house, the odds are good that you can take the old dingy cover that just isn't working anymore and still use the perfectly good pillow inserts with a new pillow cover. With decorative pillows running about $12-$15 a piece why wouldn't you want to get as much use out of them as possible? I found these two inside a pair of throw pillows that went to our old couch. The pillowcases on them were absolutely falling apart and just didn't go with our new furniture. There is so much I can do with these...but we'll get to that later.

This is a mistake that people also make with picture frames. Sure you can get lucky and find frames on sale or at the dollar store, but decent frames can be costly and if you ever change your decor sometimes they don't quite go with what you have anymore....it is easy to paint a picture frame to match your new decor...and much less expensive than trying to purchase all new ones for your favorite pictures...I have a bunch of brown picture frames (we use black ones now)...I hope to refinish them to go in the kids playroom soon.

Wednesday, January 19, 2011

Maybe 3rd time's the charm?

Well last night was night two of nothing good. I did see one dresser, but it was mdf board. I considered taking it to show everyone how you can use prints and such to give cheap furniture a new look, but I noticed that the drawers did not slide very well either, plus it had rained and made some of the fake wood bubble a little. In the end I decided to leave it, even thought it would have been my only find for the evening.

But have no fear, I had some more things to take pictures of. You should know that obviously all of these projects will be put to good use in the coming weeks as I show you how to redo them. I hope to have a wide variety of things and use different techniques and ideas. I hate doing two things the same...it makes it very boring for me.

The first piece is actually a chandelier. It is very brass and tacky now, but I have some things in the works that is going to make this look great in a nursery or little girl's room. Just stay tuned.


The next piece is actually a coffee table/end table combo. I already started to take these apart before it occured to me to get pictures....the wooden boards on the wall actually go into the bottom of the tables. As you can see they are woven like some kind of wicker look and very outdated, but I have a really neat trick that I saw on a design show to update this set.


Going to head out to another neighborhood tonight, even though its after midnight (I know I'm crazy). Hopefully no one calls the cops b/c they hear me outside. That would be so much fun to explain!

Tuesday, January 18, 2011

Treasure Finds for Monday January 17, 2011

Unfotunately the neighborhood I visited last night was not very generous with their curb treasures. However, I did find a few things that I had scored free from a while ago and had completely forgotten about. I decided to post them today because I couldn't bare to have an empty post my third day into my mission.

The first item I have I scored at an estate sale. The people didn't mark a price on it, so the daughter told me to just go ahead and take it. It is an oar that I cannot wait to sand down and paint on.

(I know you can picture this sanded down with a cute ocean scene painted on it...gonna look great on my wall!)

The other item that I found yesterday is a mirror from an old dresser. When my son got a dresser handed down to him, he decided that boys do not need mirrors. So it has been in a closet ever since waiting for me to decide what to do with it. I guess I thought maybe one day I would redo the dresser and mirror together. Instead I now have plans to redo the dresser to go with my son's new furniture so this piece is officially homeless. The great news? The brackets come off with the easy use of a screwdriver and installing mounting hardware will be a breeze because of the mirrors sturdy wood frame. I have amazing plans for this piece!

                                    Good news: I'm not a vampire...I see my reflection!!!

Hopefully tonight will prove more fruitful than last night, or tomorrow's post might be a little boring :)

Monday, January 17, 2011

Treasure Finds for Sunday January 16, 2011

The first find we made was covered in a lot of stuff. It is a beautiful table. It is very beat up, but with some sanding, stain/paint it is going to make a beautiful chunky piece of furniture once again.

The next piece we found is going to make a great desk chair for my son. The chair is in perfect stable condition, it has no major scratches or anything on it. The only thing it will require is a new cushion and someone actually put this on the curb!!!

Sunday, January 16, 2011

Furniture Madness

I have decided that this year I would do a lot more projects. However, I cannot really afford to purchase a bunch of second hand pieces from thrift stores and online classifieds to keep me busy. So, I have decided to consider...we'll call them other sources. I am officially declaring myself a trash picker. Tomorrow is trash day in our neighborhood so starting tonight I will be driving around with my Suburban on the hunt for free pieces that I can refinish and resell (unless I really really like them of course!).

I will continue this every day for at least this week to see what kind of treasures are out there and I will share them with you. If I am successful I will announce an exciting and suspenseful personal challenge next Sunday night.

Until then you can take a look at my website www.ladycrafty.weebly.com to see some of my recent furniture and other projects. You can also check me out on facebook at http://www.facebook.com/pages/Lady-Crafty/157077367672992.

Wish me luck!